Tutorial: Building a house
Introduction
This tutorial will go through the step-by-step process of building a house in Minecraft with GDPC. It will pass over most of the main components of the library, explaining them as they come along. The house will be built on the ground at a spot that can be specified in-game, and will have some simple randomized variation.
The tutorial assumes basic knowledge of Python and numpy, but almost no knowledge of Minecraft (beyond how to launch it). If anything is unclear, feel free to hop on the GDMC Discord, where we’ll be happy to clear it up for you!
Preparing a world
First, we’ll create a Minecraft world to build in. Any world will do, but the following settings are recommended for this tutorial:
Game Mode: Creative.
Difficulty: Peaceful.
Allow Cheats: ON.
World / World Type: Single Biome.
By default, this will create a plains-only world, which is quite useful for testing.
Hello block!
Now, we’ll make a change to world using GDPC. We’ll start by placing a single block in the air, close to the world spawn.
The first thing to do is to create an Editor object. Nearly every GDPC
program will involve such an object – it serves as the main point of
communication between GDPC and the Minecraft world.
Once we have an Editor object, we can place blocks
with Editor.placeBlock().
This function has two required arguments: the (X,Y,Z)-coordinates to place a
block at and the block to place (a Block object).
In Minecraft, the Y-coordinate indicates height, with sea level at Y=62. We’ll place a block at (X=0, Y=128, Z=0) – right above the world spawn (X=0, Z=0) and high enough to not be inside a mountain.
from gdpc import Editor, Block

editor = Editor()

editor.placeBlock((0,128,0), Block("red_concrete"))
Important
Make sure you have a world open with the
GDMC HTTP Interface mod
installed! (See Installation.)
If you don’t, GDPC will raise an InterfaceConnectionError.
Note
In the snippet above, (0,128,0) is an example of a 3D vector: three numbers
that indicate a position in space. In GDPC, any object that “behaves like a
vector” will work for vector parameters. This includes things like tuples, lists
and numpy arrays. Whenever GDPC returns a vector, it will always be a
PyGLM vector object, which has
.x .y .z attributes and some other useful features.
For more info, see Overview - Vectors.
If you run this program and all goes well, a block of red concrete should appear at (X=0, Y=128, Z=0). You can teleport on top of it with the following in-game command (type it in chat):
/tp 0 129 0

Your first block!
It’s also possible to retrieve blocks from the world (though we won’t need it
for this tutorial). For this, there’s Editor.getBlock(). As a quick
example, we’ll retrieve the block we just placed.
from gdpc import Editor, Block

editor = Editor()

editor.placeBlock((0,128,0), Block("red_concrete"))

block = editor.getBlock((0,128,0))
print(block)
This should print minecraft:red_concrete.
Working with the build area
The previous snippet placed a block at a hardcoded location, but for our house, we’ll eventually want a way to place it at any location of our choosing. We could set up command-line arguments for our program, but there’s a more convenient way: using the GDMC HTTP interface’s build area feature.
The build area is a 3D box that can be set with a command in-game and then retrieved with code. It’s meant for specifying the bounds in which your program should operate, and it is the standard way of doing so in the GDMC competition.
Note
In GDPC, the build area is merely a suggestion: its bounds are not enforced. It is up to you to request the build area and adhere to it. Future versions may however add (optional) enforcement.
To set the build area, we will use the in-game /setbuildarea command. It takes
six arguments: xFrom, yFrom, zFrom, xTo, yTo, zTo – The
coordinates of two corners (inclusive). The command supports Minecraft’s
Relative coordinate notation:
~10 indicates “the player’s position in that axis, plus 10 blocks”. In
Minecraft, the Y-coordinate indicates height, so you usually want to keep
yFrom and yTo static.
Set the build area to a 64x256x64 box starting at our current (X,Z)-position and spanning from Y=0 to Y=255 with the following command:
/setbuildarea ~ 0 ~ ~63 255 ~63

Tip
You can re-use the command at a different location by pressing Up while the chat is open.
We can now retrieve the specified build area in our program with
Editor.getBuildArea(). This function returns the build area as a
Box object, which is a wrapper around an offset (position) and
a size (both 3D vectors).
from gdpc import Editor, Block

editor = Editor()

buildArea = editor.getBuildArea()
print(buildArea)
If you run the program, it should print the offset and size of the box you just specified in-game.
Building the floor
Now that we know where to build, we can get started on the actual house. We’ll build it in the northwest corner of the build area. For now, we’ll have it float in the air (Y=128) – We’ll look into finding the ground later. We’ll start with a 5x5 floor of stone bricks:
from gdpc import Editor, Block

editor = Editor()

buildArea = editor.getBuildArea()

y = 128

for x in range(buildArea.offset.x, buildArea.offset.x + 5):
    for z in range(buildArea.offset.z, buildArea.offset.z + 5):
        editor.placeBlock((x, y, z), Block("stone_bricks"))
Since we’re now placing more than one block, we will also enable the Editor’s
buffering mode by constructing it with buffering = True.
This will cause the Editor to buffer all block changes and send them to the
GDMC-HTTP interface in large batches. This significantly improves performance,
and is highly recommended in all cases where it does not matter that the world
changes are staggered.
from gdpc import Editor, Block

editor = Editor(buffering=True)

buildArea = editor.getBuildArea()

y = 128

for x in range(buildArea.offset.x, buildArea.offset.x + 5):
    for z in range(buildArea.offset.z, buildArea.offset.z + 5):
        editor.placeBlock((x, y, z), Block("stone_bricks"))
The result:

A small start.
Using a geometry helper
Looping through the floor coordinates is fine and all, but we can make it
simpler using a helper function from gdpc.geometry! This module contains
functions for building all kinds of geometrical shapes. We’ll use
placeCuboid(), which places a solid box of blocks between two given
corners (inclusive).
from gdpc import Editor, Block
from gdpc.geometry import placeCuboid

editor = Editor(buffering=True)

buildArea = editor.getBuildArea()

y = 128
x = buildArea.offset.x
z = buildArea.offset.z

placeCuboid(editor, (x, y, z), (x+4, y, z+4), Block("stone_bricks"))
Side-note: we can use another helper, placeRectOutline(), to visualize the
(X,Z)-rectangle of the build area. We won’t include this in any further
examples, but if you’re ever confused about where the build area is, you can add
it in.
from gdpc import Editor, Block
from gdpc.geometry import placeCuboid, placeRectOutline

editor = Editor(buffering=True)

buildArea = editor.getBuildArea()

placeRectOutline(editor, buildArea.toRect(), 140, Block("red_concrete"))

y = 128
x = buildArea.offset.x
z = buildArea.offset.z

placeCuboid(editor, (x, y, z), (x+4, y, z+4), Block("stone_bricks"))
Building the main shape
Next, we’ll build the walls and ceiling. We can use a trick here: we can place
a hollow box with geometry.placeCuboidHollow() and then overwrite
the floor with placeCuboid().
from gdpc import Editor, Block
from gdpc.geometry import placeCuboid, placeCuboidHollow

editor = Editor(buffering=True)

buildArea = editor.getBuildArea()

y = 128
x = buildArea.offset.x
z = buildArea.offset.z

# Build main shape
placeCuboidHollow(editor, (x, y, z), (x+4, y+4, z+4), Block("oak_planks"))
placeCuboid(editor, (x, y, z), (x+4, y, z+4), Block("stone_bricks"))

Slowly getting house-shaped…
Adding a roof
Now, let’s move on to the roof! A common building technique for roofs is to use stairs blocks. Unlike the blocks we’ve used so far, stairs blocks can have different configurations: they can face in multiple directions, and can even be upside-down. In Minecraft, basic block configurations like these are usually denoted using key-value properties called block states. One way to view a block’s block states is to press F3 and look at it. The block ID and block states will be shown at the bottom right, below “Targeted Block”.
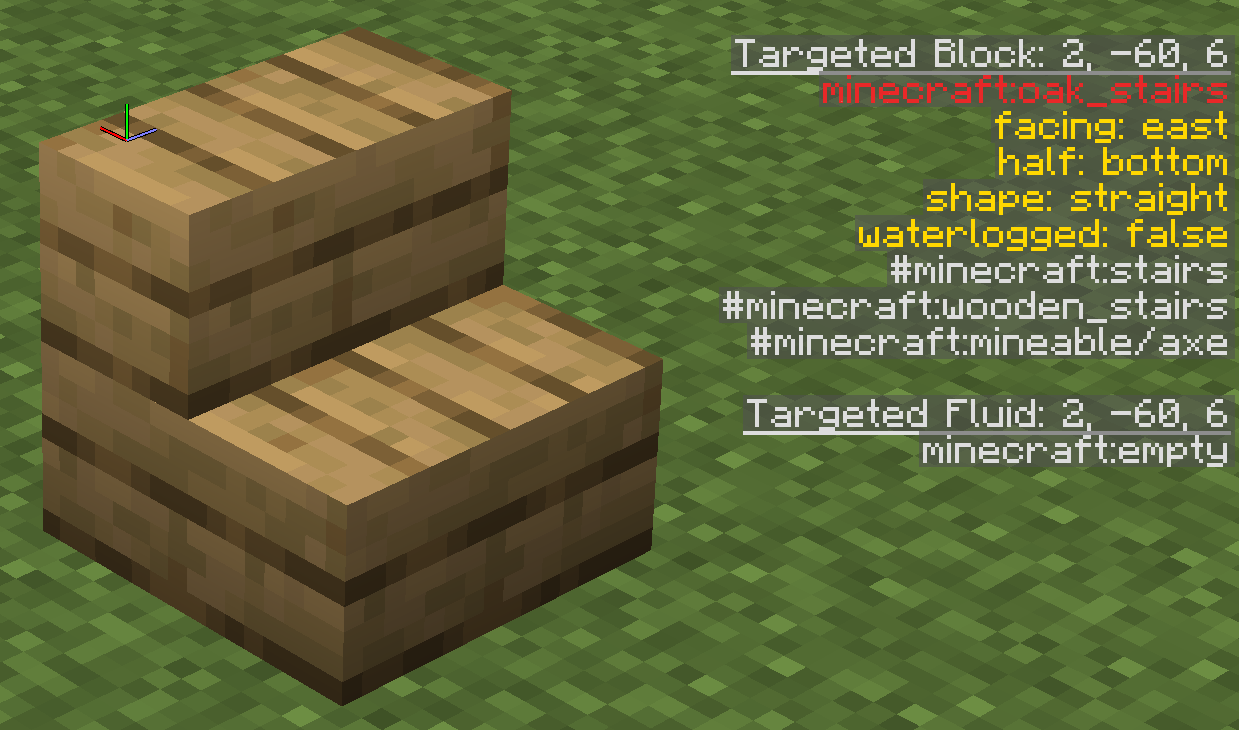
Block info shown by the F3 view. We’ve higlighted the block ID in red and the block states in yellow.
In GDPC, you can specify the block states of a Block instance by
passing a dict as the second parameter:
block = Block("oak_stairs", {"facing": "east", "half": "bottom"})
Note
Blocks can also have a third property called block entity data, which we won’t go into here. For more info, see Overview - Advanced blocks.
Now, let’s build the roof. This step will be a little more complicated, since the roof will be diagonal. We’ll also move the house one block over in the X and Z directions to make space for some overhang.
from gdpc import Editor, Block
from gdpc.geometry import placeCuboid, placeCuboidHollow

editor = Editor(buffering=True)

buildArea = editor.getBuildArea()

y = 128
x = buildArea.offset.x + 1
z = buildArea.offset.z + 1

# Build main shape
placeCuboidHollow(editor, (x, y, z), (x+4, y+4, z+4), Block("oak_planks"))
placeCuboid(editor, (x, y, z), (x+4, y, z+4), Block("stone_bricks"))

# Build roof: loop through distance from the middle
for dx in range(1, 4):
    yy = y + 6 - dx

    # Build row of stairs blocks
    leftBlock  = Block("oak_stairs", {"facing": "east"})
    rightBlock = Block("oak_stairs", {"facing": "west"})
    placeCuboid(editor, (x+2-dx, yy, z-1), (x+2-dx, yy, z+5), leftBlock)
    placeCuboid(editor, (x+2+dx, yy, z-1), (x+2+dx, yy, z+5), rightBlock)

# build the top row of the roof
placeCuboid(editor, (x+2, y+5, z-1), (x+2, y+5, z+5), Block("oak_planks"))

A good roof can make all the difference.
Finding the ground
It’s now time to actually place the house on the ground, which means we need to
find it. There are multiple ways to go about this. For example, you could scan
the world from top to bottom with Editor.getBlock(). However, the easiest
method is probably by using a heightmap. Minecraft itself keeps track of
several heightmaps, to which GDPC provides
access via the WorldSlice class.
The WorldSlice class acts as a snapshot of the world, and allows for very fast
block retrieval once it’s been loaded. For this tutorial, however, we’ll only
use its heightmap feature.
You can explicitly construct a WorldSlice instance, but the recommended way is
to use Editor.loadWorldSlice(), which will make it available as
Editor.worldSlice. This way, you can also configure the Editor to use
the WorldSlice as a cache for block retrieval. By default,
Editor.loadWorldSlice() will load the specified build area.
from gdpc import Editor, Block
from gdpc.geometry import placeCuboid, placeCuboidHollow

editor = Editor(buffering=True)

buildArea = editor.getBuildArea()

# Load world slice of the build area
editor.loadWorldSlice(cache=True)

# (...)
The heightmaps are available as a dictionary of 2D
numpy arrays indexed with (X,Z)-coordinates,
with [0,0] indicating the height at the start of WorldSlice (in our case, the
build area). We’ll use the “MOTION_BLOCKING_NO_LEAVES” heightmap, which stores
the heights of the highest blocks that block motion or contain a fluid but which
are not leaves. That’s usually what we consider “the ground” (tree trunks are an
exception).
# (...)

# Load world slice of the build area
editor.loadWorldSlice(cache=True)

# Get heightmap
heightmap = editor.worldSlice.heightmaps["MOTION_BLOCKING_NO_LEAVES"]

# (...)
We’ll place the house such that its midpoint is flush with the ground. The heightmap values actually contain the Y-level of one block above the highest one (because that’s how Minecraft stores them), so we subtract one from the value.
from gdpc import Editor, Block
from gdpc.geometry import placeCuboid, placeCuboidHollow

editor = Editor(buffering=True)

buildArea = editor.getBuildArea()

# Load world slice of the build area
editor.loadWorldSlice(cache=True)

# Get heightmap
heightmap = editor.worldSlice.heightmaps["MOTION_BLOCKING_NO_LEAVES"]

x = buildArea.offset.x + 1
z = buildArea.offset.z + 1

y = heightmap[3,3] - 1

# Build main shape
placeCuboidHollow(editor, (x, y, z), (x+4, y+4, z+4), Block("oak_planks"))
placeCuboid(editor, (x, y, z), (x+4, y, z+4), Block("stone_bricks"))

# Build roof: loop through distance from the middle
for dx in range(1, 4):
    yy = y + 6 - dx
    leftBlock  = Block("oak_stairs", {"facing": "east"})
    rightBlock = Block("oak_stairs", {"facing": "west"})
    placeCuboid(editor, (x+2-dx, yy, z-1), (x+2-dx, yy, z+5), leftBlock)
    placeCuboid(editor, (x+2+dx, yy, z-1), (x+2+dx, yy, z+5), rightBlock)

# build the top row of the roof
placeCuboid(editor, (x+2, y+5, z-1), (x+2, y+5, z+5), Block("oak_planks"))
Important
If you’ve been using the same build area, now would be a good time to start moving and changing it between steps. Otherwise, the house will build on top of the previous one!

Now it’s getting *terrain-adaptive*.
Adding randomization
One of the advantages of building a house piece-by-piece like this, is that it’s easy to add in variation. We’re going to randomize the following three aspects of the house:
Its height
Its depth
Its materials
First off, the height and depth. We’ll use Python’s random.randint()
function to randomly set height and depth variables within a set range, and
replace some of our hardcoded values with them:
from random import randint
from gdpc import Editor, Block
from gdpc.geometry import placeCuboid, placeCuboidHollow

editor = Editor(buffering=True)

buildArea = editor.getBuildArea()

# Load world slice of the build area
editor.loadWorldSlice(cache=True)

# Get heightmap
heightmap = editor.worldSlice.heightmaps["MOTION_BLOCKING_NO_LEAVES"]

x = buildArea.offset.x + 1
z = buildArea.offset.z + 1

y = heightmap[3,3] - 1

height = randint(3, 7)
depth  = randint(3, 10)

# Build main shape
placeCuboidHollow(editor, (x, y, z), (x+4, y+height, z+depth), Block("oak_planks"))
placeCuboid(editor, (x, y, z), (x+4, y, z+depth), Block("stone_bricks"))

# Build roof: loop through distance from the middle
for dx in range(1, 4):
    yy = y + height + 2 - dx

    # Build row of stairs blocks
    leftBlock  = Block("oak_stairs", {"facing": "east"})
    rightBlock = Block("oak_stairs", {"facing": "west"})
    placeCuboid(editor, (x+2-dx, yy, z-1), (x+2-dx, yy, z+depth+1), leftBlock)
    placeCuboid(editor, (x+2+dx, yy, z-1), (x+2+dx, yy, z+depth+1), rightBlock)

# build the top row of the roof
yy = y + height + 1
placeCuboid(editor, (x+2, yy, z-1), (x+2, yy, z+depth+1), Block("oak_planks"))
As for the materials, we’ll randomize them in two ways: for the walls, we’ll
randomly pick from a few options using Python’s random.choice() function.
For the floor, we’ll use another feature of GDPC: random block palettes. We can
pass a list of blocks instead of a single one to any block-placing function,
and GDPC will automatically sample the palette randomly. This can be useful for
achieving a more “rugged” look.
from random import randint, choice
from gdpc import Editor, Block
from gdpc.geometry import placeCuboid, placeCuboidHollow

editor = Editor(buffering=True)

buildArea = editor.getBuildArea()

# Load world slice of the build area
editor.loadWorldSlice(cache=True)

# Get heightmap
heightmap = editor.worldSlice.heightmaps["MOTION_BLOCKING_NO_LEAVES"]

x = buildArea.offset.x + 1
z = buildArea.offset.z + 1

y = heightmap[3,3] - 1

height = randint(3, 7)
depth  = randint(3, 10)

# Random floor palette
floorPalette = [
    Block("stone_bricks"),
    Block("cracked_stone_bricks"),
    Block("cobblestone"),
]

# Choose wall material
wallBlock = choice([
    Block("oak_planks"),
    Block("spruce_planks"),
    Block("white_terracotta"),
    Block("green_terracotta"),
])
print(f"Chosen wall block: {wallBlock}")

# Build main shape
placeCuboidHollow(editor, (x, y, z), (x+4, y+height, z+depth), wallBlock)
placeCuboid(editor, (x, y, z), (x+4, y, z+depth), floorPalette)

# Build roof: loop through distance from the middle
for dx in range(1, 4):
    yy = y + height + 2 - dx

    # Build row of stairs blocks
    leftBlock  = Block("oak_stairs", {"facing": "east"})
    rightBlock = Block("oak_stairs", {"facing": "west"})
    placeCuboid(editor, (x+2-dx, yy, z-1), (x+2-dx, yy, z+depth+1), leftBlock)
    placeCuboid(editor, (x+2+dx, yy, z-1), (x+2+dx, yy, z+depth+1), rightBlock)

# build the top row of the roof
yy = y + height + 1
placeCuboid(editor, (x+2, yy, z-1), (x+2, yy, z+depth+1), Block("oak_planks"))

A varied little town.
(We may have manipulated the random values to create a nice screenshot.)
Finishing touches
It’s time to put in some finishing touches. First, we’ll add a door so we can actually enter the house. For multi-block objects such as doors and beds, you only need to place one block and the entire object will get placed. We’ll also make an adjustment to put the door at the ground level instead of the house midpoint.
(...)

y = heightmap[3,1] - 1

(...)

# Add a door
doorBlock = Block("oak_door", {"facing": "north", "hinge": "left"})
editor.placeBlock((x+2, y+1, z), doorBlock)
One problem with the door is that it can occasionally get obstructed by the surrounding blocks. Furthermore, now that you can enter the house, you may notice that it can occasionally have some blocks from the original terrain inside of it. To fix these issues, we’ll add some code to clear out the inside of our house and the area in front of the door.
To “remove” blocks in the world, you can place Block("air") on top of
them:
(...)

# Build main shape
placeCuboidHollow(editor, (x, y, z), (x+4, y+height, z+depth), wallBlock)
placeCuboid(editor, (x, y, z), (x+4, y, z+depth), floorPalette)
placeCuboid(editor, (x+1, y+1, z+1), (x+3, y+height-1, z+3), Block("air"))

(...)

# Add a door
doorBlock = Block("oak_door", {"facing": "north", "hinge": "left"})
editor.placeBlock((x+2, y+1, z), doorBlock)

# Clear some space in front of the door
placeCuboid(editor, (x+1, y+1, z-1), (x+3, y+3, z-1), Block("air"))
Next, we’ll extend the floor of the house so it integrates better on uneven terrain. An easy and often sufficient method is to just extend it a set amount of blocks downward.
(...)

# Build main shape
placeCuboidHollow(editor, (x, y, z), (x+4, y+height, z+depth), wallBlock)
placeCuboid(editor, (x, y, z), (x+4, y-5, z+depth), floorPalette)

(...)
Finally, we’ll add some upside-down stairs blocks to the front and back of the roof to make it look just a little nicer.
(...)

# Build roof: loop through distance from the middle
for dx in range(1, 4):
    yy = y + height + 2 - dx

    # Build row of stairs blocks
    leftBlock  = Block("oak_stairs", {"facing": "east"})
    rightBlock = Block("oak_stairs", {"facing": "west"})
    placeCuboid(editor, (x+2-dx, yy, z-1), (x+2-dx, yy, z+depth+1), leftBlock)
    placeCuboid(editor, (x+2+dx, yy, z-1), (x+2+dx, yy, z+depth+1), rightBlock)

    # Add upside-down accent blocks
    leftBlock  = Block("oak_stairs", {"facing": "west", "half": "top"})
    rightBlock = Block("oak_stairs", {"facing": "east", "half": "top"})
    for zz in [z-1, z+depth+1]:
        editor.placeBlock((x+2-dx+1, yy, zz), leftBlock)
        editor.placeBlock((x+2+dx-1, yy, zz), rightBlock)

(...)
All together:
from random import randint, choice
from gdpc import Editor, Block
from gdpc.geometry import placeCuboid, placeCuboidHollow

editor = Editor(buffering=True)

buildArea = editor.getBuildArea()

# Load world slice of the build area
editor.loadWorldSlice(cache=True)

# Get heightmap
heightmap = editor.worldSlice.heightmaps["MOTION_BLOCKING_NO_LEAVES"]

x = buildArea.offset.x + 1
z = buildArea.offset.z + 1

y = heightmap[3,1] - 1

height = randint(3, 7)
depth  = randint(3, 10)

# Random floor palette
floorPalette = [
    Block("stone_bricks"),
    Block("cracked_stone_bricks"),
    Block("cobblestone"),
]

# Choose wall material
wallBlock = choice([
    Block("oak_planks"),
    Block("spruce_planks"),
    Block("white_terracotta"),
    Block("green_terracotta"),
])
print(f"Chosen wall block: {wallBlock}")

# Build main shape
placeCuboidHollow(editor, (x, y, z), (x+4, y+height, z+depth), wallBlock)
placeCuboid(editor, (x, y, z), (x+4, y-5, z+depth), floorPalette)
placeCuboid(editor, (x+1, y+1, z+1), (x+3, y+height-1, z+3), Block("air"))

# Build roof: loop through distance from the middle
for dx in range(1, 4):
    yy = y + height + 2 - dx

    # Build row of stairs blocks
    leftBlock  = Block("oak_stairs", {"facing": "east"})
    rightBlock = Block("oak_stairs", {"facing": "west"})
    placeCuboid(editor, (x+2-dx, yy, z-1), (x+2-dx, yy, z+depth+1), leftBlock)
    placeCuboid(editor, (x+2+dx, yy, z-1), (x+2+dx, yy, z+depth+1), rightBlock)

    # Add upside-down accent blocks
    leftBlock  = Block("oak_stairs", {"facing": "west", "half": "top"})
    rightBlock = Block("oak_stairs", {"facing": "east", "half": "top"})
    for zz in [z-1, z+depth+1]:
        editor.placeBlock((x+2-dx+1, yy, zz), leftBlock)
        editor.placeBlock((x+2+dx-1, yy, zz), rightBlock)

# build the top row of the roof
yy = y + height + 1
placeCuboid(editor, (x+2, yy, z-1), (x+2, yy, z+depth+1), Block("oak_planks"))

# Add a door
doorBlock = Block("oak_door", {"facing": "north", "hinge": "left"})
editor.placeBlock((x+2, y+1, z), doorBlock)

# Clear some space in front of the door
placeCuboid(editor, (x+1, y+1, z-1), (x+3, y+3, z-1), Block("air"))

An example of the final house. We’ve come a long way.
Of course, there’s lots more that we could do, such as windows, lighting and furniture, but we’ll leave that as an exercise to the reader.
Further reading
Congratulations, you’ve made to the end of the tutorial! We hope it has helped you to understand the basics of the various components of GDPC. You could now get to work on your own own generative algorithms (perhaps to take part in the Generative Design in Minecraft Competition), but if you’re still interested in learning more, you can also continue with the following parts of the documentation:
The Overview dives deeper into into all of the concepts explained here, as well as introduce some more advanced concepts such as the transformation system.
The API Reference gives detailed explanations of all public objects of GDPC.